Thursday, August 4, 2011

Ornaments


It's been so very long since I have posted and I have years worth of stuff to catch up on but for now, here is a picture of the Christmas ornaments I will be making for this years Boutique. (crossing my fingers) This is just one of the styles and colors that I am making. This holds a 3 1/2" photo. I'm so excited!

Saturday, April 17, 2010

Makeover Month @ the Cecil's part #1


Unfortunately, "I" am not the one getting the makeover ( maybe after I have baby #4-10 weeks and counting). But, my house is in the PROCESS of being "made-over". I know that my maternal instincts are supposed to be kicking in, but my addiction to all things manly is in over drive.

For part 1 of the things I've been up to..... Vintage sign overload! I am re-doing the boys room in a 1950's-60's era cowboy who know's what. I didn't want the room to look traditional cheesy cowboy, so I'm trying to add elements of rustic something. Ok, I can't explain it. It's in my head and hopefully when it's done it will make sense. But for now, here are a few elements I have made to add to the room.

My grandpa used to own a few 76 gas stations in California back in the 70's so I HAD to do an old 76 sign. I found a metal one online that I replicated using my jig-saw and a piece of my wood fence that my 6 yr old knocked down.

For the next two projects, I took my inspiration from Funky Junk Interiors. I saw these stairs, and was totally in love and just knew that something like THIS had to go in the room. Hence the Cornice box over the window. It actually is made as a shelf also, so if I take it down ever, I can repaint it and repurpose it somewhere else. (tutorial on making this later)

Then for my FAVORITE, and I mean FAVORITE thing, this table for the boys to play with their lego's on. My feet are totally thanking me for building this!
The plans for this table are found on Knock Off Wood HEREand the design inspiration again came from Funky Junk Interiors. I strongly urge you to visit Ana's site and dare you to not drool! She is so talented it's scary.
The table comes with an edge that is raised up higher than the table top, so that the Lego's don't fall off onto the floor. Again, I wanted to make it look like it was made with reclaimed signs and bits of wood. So easy, and it only cost me about $30 and one afternoon to make. Not bad since the tables like this at pottery barn cost $349. I chose to use the soft tubs underneath for now and like them. Still...MASSIVE SAVINGS!


And a new light from Ikea for only $30. LOVE this thing. Hubby picked it out!
Can't wait to show some of the other things that I'm working on!

Thursday, October 1, 2009

Apron from a mans shirt tutorial

I had a few requests to show how to make this apron so here is my attempt.

DISCLAIMER........ this is my very first attempt at photographing and writing a tutorial. I have only been sewing for a little over a year and I know these instructions are not perfect. If you see where I could make this tutorial more user friendly in the instructions, please feel free to give your suggestions. I may take them. Those of you that really know me, know that I am not the best with words...I could walk you through making this apron much better than I can write it! Anyway, have fun!


Choose a mans button up shirt. XL is probably best but a large will work too.

Cut off the sleeves on the the inside of the seam. Flip shirt over and cut across the upper back portion of shirt.

Then cut up the middle back of the shirt, stopping once you have cut through your previous cut across the back. (this will form a "T" shaped cut)

Unbutton shirt and pin together. This will be the center "fold" of your apron. Make sure to pin it well and match up all spots where button holes and buttons meet.
If you have an old apron to use as a pattern lay it on top of the shirt, matching the bottom edges. If not, use your imagination or measure your body. How wide do you want it across your chest? where do you want your ties to be? On your hips or waist.
Cut out apron. I cut about 1-2 inches larger than my purple "template" for the seam allowance.

While your shirt is still folded, cut off the bottom of the shirt so that it is a straight edge. You can use the bottom of the shirt if you like, but since I am tall, I like my apron to be a little longer so I am going to add a band of fabric.

Cut a strip of complimentary fabric 6 1/2 inches high x however wide the bottom of your apron is.
Fold the strip in half, wrong sides together. Iron. Pin raw edges of fabric to the raw edge of your apron. Sew together using a 1/2 inch seam allowance. I also added a pre-made bias tape ruffle, but you of course don't have to!

Iron the seam towards the band and top stitch.

You can use bias tape to finish off the raw edges or you can "hem" them like you would a skirt by folding over the raw edges 1/4 inch, ironing, and folding over one more time (to make a clean seam) ironing, and stitching close to the folded edge. I did both. I used bias tap for the curved body parts and for the straight sides, I folded over and sewed.
Make ties using Wide double fold bias tape, or use the fabric from the sleeves to create your ties.

Make pockets by cutting two 6 1/5 inch squares from your outer pocket fabric and two from fabric for the lining. Place right sides together and pin. Sew a 1/2 inch all the way around the square leaving a 2 inch opening to turn the pocket. Clip the 4 corners of the pocket. Turn right side out. Press. Place pockets in desired spot on the apron and pin in place. sew a 1/4 inch seam around the sides and bottom to secure in place.

TA DA!!!! your apron is ready to wear. And what man wouldn't enjoy seeing his wife in one of his old shirts! (it's such a guy thing)

Wednesday, September 2, 2009

Oh "sew" pretty (couldn't resist the pun)


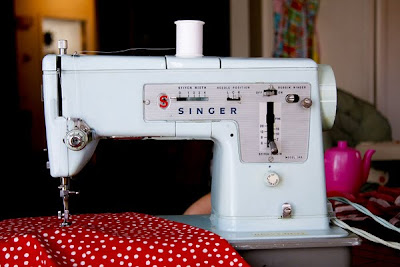
I don't normally like to brag but..................Isn't she pretty!?!? I found her today at a yard sale. This is a heavy duty machine. I am super excited. It actually runs very smooth. I'm not normally a singer user but when I saw it, I knew it needed to come home with me. Anyone want to help me decorate my house around it?

Watch for a tutorial coming soon on how to turn a mans dress shirt into an apron and a little girls dress!

Monday, August 31, 2009

Some people are brilliant!!


I found this idea on the U create blog and instantly knew it was exactly what I needed to complete the boys room makeover. I am not finished with the room yet, I still have to make the quilts and hang some pictures, but I couldn't wait any longer to show you!
These shelves are made out of $7 rain gutters from lowes. I used the leftover baseboard and a small can of chalkboard paint for the rest. This has created hours of quiet time in my house this weekend!

Check out U-create HERE

Tuesday, May 26, 2009

What's in a name?!?!?

The other morning while dropping my son off at school, another mom noticed that I was wearing on of my many aprons. This one was nothing special.... actually it was a $3 target clearance find. Anyway, she asked if that was just part of my wardrobe. To which I replied, "YES"! I start my day by putting on my apron. To me, it's almost as important as putting on a bra. (Ok, for me even more important than a bra, because I actually NEED an apron!)

At any time, on any given day, I have a multitude of "things" in my apron pocket. These are signs of a mother, multitasking, in all her motherly glory. A half broken (or eaten) crayon, the matchbox car that I've stepped on at least 100 times, lip gloss, cell phone, house phone, change, tissue, a bobby pin or two, safety pin, maybe a sock, empty fruit snack wrapper...etc. You get the idea.
This is commonplace for me. It is usually things I have picked up throughout the day. This gave me the idea for THIS blog. IN MY APRON POCKET is a place where I can gather together all the "things" that I love and have "picked up". A place to jump "in" a find something you like to do or may want to try. (hopefully)

One day, I may just show something I have recently completed, or a recipe that my kids actually ate. I may showcase a fellow blogger and their accomplishments. This is a place where the crafty, and crafty challenged can come together and get ideas from other blogs for many many things.

If you want to contribute anything, email me, and I'll be sure to post it. I hope you enjoy being "IN MY APRON POCKET"